
American Camellia Society Camellia Growing Tips & Culture
American Camellia Society The Garden Report: Questions & Answers
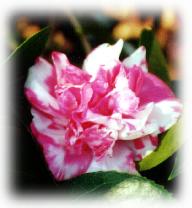
Norfolk Botanical Garden Hofheimer Camellia Garden
Cuttings One of the most common methods of propagating a camellia is by rooting cuttings. It is not the quickest method, but it is the easiest and least expensive method to reproduce plants. Most nurseries us this method exclusively. One advantage in growing cuttings is that the resulting plants will be exact duplicates of the original plant. However, if the cutting is taken from a branch that flowers a mutation (sport) of the original cultivar, the cutting will usually be a reproduction of the sport but may be the original plant.
Not all camellias root readily from cuttings, but with good facilities, bottom heat, intermittent mist, and rooting hormones almost any camellia cutting can be rooted successfully.
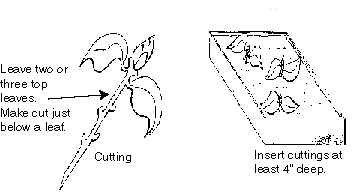
Cuttings of new growth are the easiest to root. They should be taken soon after the tender growth matures and hardens (May - August). The cut should preferably be made around the fifth node (the node is the tiny bud-like growth at the base of the leaf junction with the stem). Cuttings of this length are long enough to remove the lower leaves, leaving eyes from which roots will develop in addition to those at the cut end. A tapering cut should be made at the base of the cutting. This allows more surface for roots to develop. To reduce dehydration, the leaves left on the cutting may trimmed back one-half.
A media of one-half sand and one-half peat has been proved successful. Also used are vermiculite and perlite. The medium should drain well but not dry out too quickly. Any box, pot, or container, or bed at least 4-6 inches deep that provides good drainage is suitable for the medium. Although not necessary, a rooting hormone may speed up rooting if applied to cuttings before inserting into the medium.
Cuttings should be place in rooting media about 2 inches apart and 2-3 inches deep. A covering of glass or plastic over the pot will help to retain moisture. Intermittent mist is used by nurserymen to prevent drying out. Cuttings should be kept moist, but not wet at all times. When cuttings are well rooted, usually mid-to-late winter, transfer them to pots or plant in a protected bed. A small number of cuttings may be rooted in a pot of sand covered with a milk jug or soft drink bottle with bottom removed.
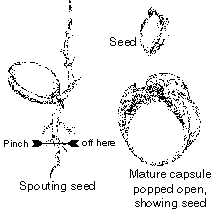
Seed Growing plants from seed presents the gardening enthusiast with a real challenge. Camellias do not come true from seed and very rarely is a good flower produced from seed. Out of many seedlings, the chances for a superior variety are very slim since camellias have been hybridized for over 2000 years to produce the varieties available today.
Camellia seed ripen at different times depending on variety and location. However, seed generally mature in early fall. When seed are mature the pod begins to crack slightely and seed are ready to be picked. Soak the seed for 12 hours or crack carefully the hard coat to aid in germination. Plant in good soil, peat moss, or a combination of peat moss and sand. Keep the soil damp. Seed usually germinate in one month if planted immediately after harvesting. Other seed may not germinate until spring. Once the seed have germinated, transplant into containers or outside. Cutting off the tap root will produce a more fibrous root system and is helpful if planting in a container. If planted outside the tap root will help the plant survive during periods of drought or severe cold. Better germination will occur when seed are planted immediately upon ripening.
The Virginia Camellia Society © 2004
Web Design by